Showing posts with label crochet. Show all posts

Monday, 28 January 2013

Skull Stitch Markers and Crochet-Fixing

Removable crochet stitch markers -- skulls

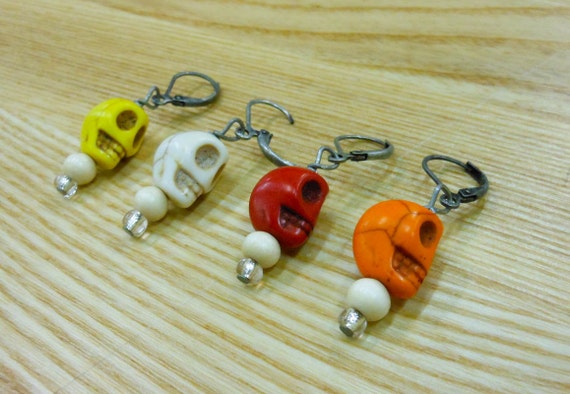
I just had to share my new crochet stitch markers with everyone. I bought them on Etsy from Hooray Crochet and am absolutely in love with them! I had been in need of stitch markers for a long time (I had been using paper clips) but I really didn't want to buy markers that I didn't love! I'm one of those people who likes everything little thing to be cool. If I don't love something, if it doesn't make me smile, there is not a heck of a lot of reason to own it. Speaking of which I'm on the look out for a cool teapot if anyone has any ideas...

Also!

Hubby and I have been together since we were teenagers and once, while at the mall, 16-year-old hubby with cash to burn bought this big fluffy red circle pillow for no apparent reason.

 
Now, I try not to be the wife who tells her husband what he can and cannot own, and he was oddly attatched to this pillow. But, I also spend a lot more time in our house than he does since I work at home and this thing was an eye sore in the eclectic brown and blue tones of our bedroom. So...I hooked the crap out of it and made it pretty.


I didn't use a pattern for this but if your even a little familiar with your crochet hook this is an easy project to pull off, and honestly if you don't even own one yet you could watch a couple youtube videos on how to cast on and do the puff stitch and you'd be golden. I just used leftover yarn from my stash and a matching hook. If you have the pillow you're covering on hand you can just keep checking to make sure that you're on thr right track. 
 
It's simply a round of single crochet, then half double, then single again to create that textured look on the top. Then I alternated puff stitch and single crochet around the sides for what I hope is a Morroccan feel. I used a hook that was a little small for the yarn so that my stitch was really tight as I didn't want the red to show through, but you could also line the case when you're done. I overlaped the top and bottom layers so that the pillow can be pulled out to wash the cover and there are no buttons are zippers to unepectedly poke at you when you're trying to nap.
 
This would be a very rewarding and only somewhat challening project for a beginner. I hope it inspires someone to de-ugly something their partner won't get rid of!
 
May the craft be with you!

Saturday, 8 September 2012

Crocheting for my baby boy!

Hello foxy crafters!

The world seems rife with boring overly cutesy baby clothes and I'm just not cool with it. Luckily I have some craftiness up my sleeve. Here's what I've made so far. Click the pics to be taken to the patterns:


Monday, 13 August 2012

Nerdy Crochet!

Hey everyone!

I know it's been for-frakin'-ever since I've posted and I apologize. I've been busy being pregnant and allowed that to get in the way of my blogging (FOR SHAME) but certainly have not allowed it to get in the way of my crafting (WOOT!)

This is by far one of my favourite things I've ever hooked:


Who says crocheting can't be awesome?


The how-to is easy enough but I didn't have a pattern (naturally). I made my own and it`s acutally super easy to make your own crochet-by-numbers style pattern.

Step One:

Draw the outline (to scale) of your project on graphing paper.

Step Two:

Make your pattern by colouring in squares. You can use as many colours or as complicated a pattern as you want it just means you`ll be switching yarns more often.

Note:

For this project each square on graphing paper is acutally represented by 6 stitches done over two rows. On the bottom you have sc-dc-sc and on the top you have dc-sc-dc. It`s a technique I borrowed from groundhogpeggy on Youtube. She has a whole technique for crocheting images that look right from both sides. I`m not a fan of the overall technique as the contrasting yarns show through but the way she creates patterns on graph paper is really simple and easy to do.

Stay crafty!
M <3

Sunday, 10 June 2012

Slippers!

Not too long ago I got these weird red bumps on my toes. They kinda freaked me out so I went to see a dermatologist about them. Apparently my toes are very sensitive to cold. A few pairs of warm socks and I would be all fixed up. Well, thanks doc, and that was all well and good until I attempted to wear those fleecy mountain man socks for more than an hour. And you know what? OW! So I asked the dermatologist about it but he turned out to be one of those asshats who don't believe FMS is a thing. I calmly informed him that it can be viewed on catscans and walked out.

Crocheting time!


These things are shockingly easy to make. I didn't follow a pattern so this tutorial will work for any yarn weight or hook size. Enjoy!

Ch enough to be as wide as three toes.
Crochet in the round (and stitch, I did dc), inc as you need to fit over your toes.
Measure against your foot as you go so they fit you perfectly.
Once you've reached the wide spot at the base of your toes stop increasing and crochet in roud as high as you want to go.
Then start crochet in rows so that you are creating the sole of the slipper and moving back toward the heel.
When you reach the heel decrease 3-5 with each stitch so that you create little half circle.
Tie off the heel and create two chains long enough to tie around your ankle. Single crochet them to the top of the heel in the cenre.

And VOILA! Slippers!

Monday, 7 May 2012

Wrap around earrings

Hey,

This is a super simple project and unfortunatley I forgot to take pictures (again) so you're going to have to image the majority of the tutorial but I'm sure you'll have no problem.

Here's the finished Wrap Around Earrings


Materials:
Hoop earrings
Yarn
Crochet hook
Hair spray

Step One
Crochet all round the outside of your hoop (actually took this picture).


Step Two
Wrap. Wrap horizontally until the yarn is as dense as you want it then wrap vertically. When you wrap vertically make sure you pull the yarn through the top of the hoop so you get that dip look (and a spot for you ear lobe to go). Then tie the yarn off and weave it in.


Step Three
Spray. The yarn's not super stable yet. I just hair-sprayed the earrings, pressed a tissue over them to get rid of the bubbles and let them dry. They're pretty firm now!

Have fun!


Monday, 9 April 2012

New Hooded Infiniti Scarf

Hello crafty people!

Anybody else have a great long weekend? I got nothing done! It was awesome, almost all my time was spent with my Sweet Talking hubby :)

Anyway, on to the tutorial:

This project is a re-do of a scarf that I made for myself which you can read about here. When my sister saw my scarf she decide she needed one too, but she's not really a hot pink kind of a girl so...beige it is!

My scarf was made with double crochet stitch, and the yarn was a little thicker so even such an open stitch was pretty warm. The beige yarn I used for my sister's scard (Super Saver) was really think so I found a lovely, thick stitch that had never worked with before: Moss Stitch. Moss stitch is really easy, just sc1, dc1 over and over again. It creates a great, thick textured look. Though it was so thick I made this scarf with only a double wrap (mine was triple) as I really didn't want my sister to feel like she was wearing a neck brace.

Step One:

Crochet 2 square for the hood and one long rectangle for the scarf. I'm not going to give you exact measurements as I have found that the best method is to measure it against your head as you work. When I made mine I used measurements that I found online and it came out all wrong. Measure the first chain of the hood from the back of your skull until it's as wide as you want it. Then crochet until it reaches as far forward as you would like (don't want to lose too much periferal vision. Then as you crochet measure from the top of your head down until the piece rests comfortably on your shoulder.

These are the pieces you need:


Step Two:

Using either single crochet or slip stitch (I use sc because I like the way it looks) crochet one short and long side of your hood pieces together so that you can place the hood over your head.


Step Three:

Twist the scarf. That twist gives a little extra bulk, making this and infiniti scarf (like a mobius strip).


Step Four:

Crochet it all together. Make sure that you crochet the scarf to the hood so that your seams are facing inward and are invisible when you are wearing the scarf, and don't forget to maintain that twist!


The final product:
My sister's not one for putting her face online so I have to model this number, but she was thrilled with it!

Thursday, 29 March 2012

Crochet Earrings!

YAY! I have a new computer and I've finally figured out how to use it. When my computer died earlier this week I really thought I would be able to go a little while without it.48 hours was enough to have me nearly pulling my hair out, and lets face it, I don't really have enough hair to be pulling it out. SO, Sweet Talker (hubby) and I got down to the lovely people at Memory Express in Richmond and got ourselves the new Transformer Prime. Aside a from a very curved learning curve as I've been using Microsoft all my life it's working out pretty well. I have been bent shouldered and red eyes for days trying to figure out how the damn thing works so I haven't been very crafty. I thought I would throw up some of my old favourites.

So, without further ado I give you Crocheted Earrings:


Materials:
Yarn
Crochet hook
Bangle
Earrings hooks

How to:


This is a pretty easy and super quick project if you already know single crochet. If you don't I would suggest checking out a couple youtube videos on the subject. That's how I learned.


Step one:


Choose a bangle or ring of your desired size. I know mine is pretty huge. I made a pair of these for my sister and SIL with small rubber rings I found at a craft store.


Step two:


Crochet the magic circle. Sc 2 or 3 depending on how thick your yarn is. Then sc in the first stitch and start crocheting in the round. Continue to crochet in the round until your circle is about the size of the bangle or ring, just a tiny bit smaller.


Step three


Sc over the ring or circle all the way around. While you're doing this the circle may begin to look a little warped but it should even out once you've made your way around.


Step four


Attach the earring hook by the yarn and wear your super cool new earrings!


Thanks for stopping by crafty people!!!


Saturday, 24 March 2012

Crochet Hooded Infiniti Scarf Tutorial

Hello everyone and happy Saturday!

I'm going to start of my weekend by sharing a new project with you. I made one of these a few months back and loved it! I wear it every chance I get. Then, my sister saw it and loved it too. I figured since I was working on a new one I should put a little tutorial up here for you lovely people. This design is not from a pattern at all. I'm just kind of winging it but it's super simple.

I got the idea when I went into a Lululemon. I had never been in one before as I don't like to spend exorbitant amounts of money on stuff that's going to get uber sweaty (unless it's getting sweaty from another kind of work out). They had these beautiful, chunky knit hooded infinity scarves and they were charging nearly 100$ and, well, that's ridiculous.

Project #2 Hooded Infiniti Scarf in Pink

Inspired by: Lululemon

Yarn: Patons in pink (sorry, Sweet Talker, aka my hubby, threw out the label)

Hook size: L

Cost: All in, about 20$

What is it?

It's a pretty basic pattern, Just a hood, and a long scarf that's attached at the front. The scarf wraps around my neck three times to keep me toasty warm. I attatched it with one twist (the thing that makes it "infiniti" so that it's a mobius strip (#nerd)

This is what it looks like when all is said and done:


How to make your own:

The hood:

The hood is just two rectangles crocheted together at the top and back.

Stitch: double crochet

Mesurements: 10" x 15" (but it's way too big

I made the hood first and it turned out way too big but haven't bothered to fix it as I can just pull it back a bit but it has proven a little unnerving when it slumps forward and kills my peripheral vision when I'm crossing the street. I would suggest making it to fit your head specifically. I'm working on a second one now (see my next post for details) and I've been measuring it from the back of my skull to where I want the hood to end. Then just holding it up to my head as I go until it's long enough. Like, I said there's no real pattern here.

The scarf:

Stitch:double crochet

Measurements: 66"x 4"

The scarf is very thin, this is so that it doesn't feel too bulky when I triple wrap it over the hood. It's a little more comfortable that way plus I like that bunched up fabric look. You can't really see it here but I put one twist in the scarf before connecting it to the hood. I quite liked the look of it. A triple wrapped length worked for this project because the double crochet is quiet an open weave but check out my next post to see a hooded infiniti scar with in moss stitch (super thick) that only wraps twice.

Stitch used for this pattern: double crochet